
介绍
Fuwari 作为一款基于 Astro 框架的轻量级静态博客模板,以其简洁的设计和卓越的性能受到开发者青睐。然而,评论功能一直是静态博客的短板,传统评论系统往往需要复杂的后端配置和数据库支持。
本文将详细介绍如何为 Fuwari 静态博客无缝集成 Giscus 评论系统,实现基于 GitHub Discussions 的轻量级、无需数据库的评论解决方案。并实现兼容亮色/暗色主题的自适应效果。
项目架构
1. 组件封装层 (src/components/misc/Giscus.astro)
Fuwari 将评论功能封装为一个独立的 Astro 组件。
- 属性传递:通过
Astro.props接收repo、repoId、categoryId等配置参数。这种做法将配置信息(存储在src/config.ts或直接传参)与显示逻辑分离。 - 动态注入:使用
<script define:vars={{...}}>将服务器端的配置变量安全地传递给客户端 JavaScript。
2. 执行逻辑层 (Client-side JS)
组件内部的脚本负责评论区的生命周期管理:
- 按需加载:通过
document.createElement('script')动态创建script标签。这样做可以避免在页面初始加载时阻塞渲染,提升 Fuwari 引以为傲的性能。 - 容器绑定:评论区被挂载到一个特定的 DOM 元素(如
#giscus-container),这使得评论区在页面布局中位置固定且可控。
3. 主题同步机制 (Theme Bridge)
这是 Fuwari 集成中最关键的部分。Fuwari 允许用户手动切换亮/暗模式,Giscus 必须实时响应:
- MutationObserver:脚本注册了一个 MutationObserver,监控
<html>标签的class属性。 - postMessage 通信:由于 Giscus 运行在
iframe中,主页面无法直接修改其样式。当观察到主题 class 变化(如切换到.dark)时,主页面会通过postMessage向iframe发送一个setConfig消息。 - 无刷新切换:Giscus 接收到消息后,内部会动态更换 CSS 变量,从而实现无需刷新页面就能完成评论区颜色的无缝切换。
4. 路由适配层 (src/pages/posts/[...slug].astro)
在 Astro 的动态路由模板中,Giscus 被放置在内容渲染区域(Markdown 内容和 License 组件)之后。
- ID 匹配:通常使用
mapping="pathname"。这意味着 Giscus 会将当前页面的 URL 路径(如/posts/my-article)作为 GitHub Discussion 的标题或标签,从而确保每篇文章都有独立的评论池。
5. 存储架构 (Backend-less)
- 无数据库:整个 Fuwari 项目依然保持 100% 静态。所有的评论数据、用户信息、点赞互动全部存储在你的 GitHub Repository Discussions 中。
- 安全性:通过
giscus.json(如果配置了的话)可以限制哪些域名可以调用该评论插件,防止他人盗用你的评论仓库。
配置
准备 GitHub 仓库
首先,我们需要在 GitHub 上创建一个专门用于存储评论的仓库。这个仓库必须是公开的,因为 Giscus 需要通过访问 GitHub 仓库来加载和提交评论。
-
创建新仓库
- 登录 GitHub,点击右上角 ”+” 按钮
- 选择 “New repository”
- 填写仓库名称(如
fuwari-comments)和其他必要信息 - 确保仓库可见性设置为 Public
-
启用 Discussions 功能
- 进入仓库的 Settings → Features
- 找到 “Discussions” 选项并勾选
- 点击 “Save changes” 保存
- Discussions 是 GitHub 为项目讨论提供的平台,Giscus 将利用这一功能存储评论
配置 Giscus
接下来,我们需要配置 Giscus 以将评论与我们的仓库关联起来。
-
连接仓库
- 前往 https://giscus.app/zh-CN
- 选择语言后在下方填写你的仓库
- 通过检查后 Discussion 将被连接到该仓库

-
选择映射关系 推荐选择
pathname,假如你的文章路径为posts/helloworld,那么只要你保证这个路径不变,评论和页面就永远匹配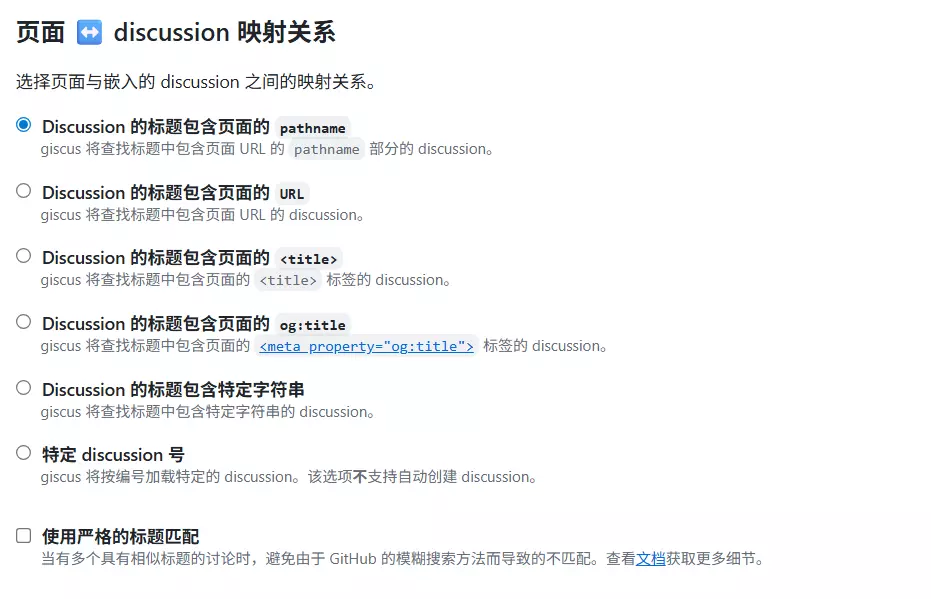
-
选择 Discussion 分类 推荐使用 公告(Announcements) 类型的分类,以确保新 discussion 只能由仓库维护者和 giscus 创建

-
获取配置信息
完成以上步骤后,记录以下配置信息,稍后将在 Fuwari 中使用:
- 仓库名称
- 仓库 ID
- 分类名称
- 分类 ID
添加到 Fuwari
-
创建 Giscus 组件
为了实现在亮色/暗色下都能使 Giscus 完美显示,我们需要在
src/components目录下创建giscus.astro文件,内容如下:
interface Props { repo: string; repoId: string; category: string; categoryId: string; mapping?: string; reactionsEnabled?: boolean; emitMetadata?: boolean; inputPosition?: 'top' | 'bottom'; lang?: string;}
const { repo, repoId, category, categoryId, mapping = 'pathname', reactionsEnabled = true, emitMetadata = false, inputPosition = 'bottom', lang = 'zh-CN'} = Astro.props;---
<div id="giscus-container"></div>
<script define:vars={{ repo, repoId, category, categoryId, mapping, reactionsEnabled, emitMetadata, inputPosition, lang }}> function loadGiscus() { const container = document.getElementById('giscus-container'); if (!container) return;
const isDark = document.documentElement.classList.contains('dark'); const theme = isDark ? 'dark' : 'light';
const script = document.createElement('script'); script.src = 'https://giscus.app/client.js'; script.setAttribute('data-repo', repo); script.setAttribute('data-repo-id', repoId); script.setAttribute('data-category', category); script.setAttribute('data-category-id', categoryId); script.setAttribute('data-mapping', mapping); script.setAttribute('data-strict', '0'); script.setAttribute('data-reactions-enabled', reactionsEnabled ? '1' : '0'); script.setAttribute('data-emit-metadata', emitMetadata ? '1' : '0'); script.setAttribute('data-input-position', inputPosition); script.setAttribute('data-theme', theme); script.setAttribute('data-lang', lang); script.setAttribute('data-loading', 'lazy'); script.crossOrigin = 'anonymous'; script.async = true;
container.appendChild(script); }
// 监听主题变化 function updateGiscusTheme() { const giscusFrame = document.querySelector('iframe[src*="giscus"]'); if (giscusFrame) { const isDark = document.documentElement.classList.contains('dark'); const theme = isDark ? 'dark' : 'light';
giscusFrame.contentWindow.postMessage({ giscus: { setConfig: { theme: theme } } }, 'https://giscus.app'); } }
// 监听DOM变化来检测主题切换 const observer = new MutationObserver((mutations) => { mutations.forEach((mutation) => { if (mutation.type === 'attributes' && mutation.attributeName === 'class') { updateGiscusTheme(); } }); });
// 页面加载时初始化 if (document.readyState === 'loading') { document.addEventListener('DOMContentLoaded', loadGiscus); } else { loadGiscus(); }
// 开始观察主题变化 observer.observe(document.documentElement, { attributes: true, attributeFilter: ['class'] });</script>-
添加到文章页面
在
src/pages/posts/[...slug].astro文件中:- 首先导入 Giscus 组件:
import path from "node:path";import License from "@components/misc/License.astro";import Markdown from "@components/misc/Markdown.astro";import AISummary from "@components/misc/AISummary.astro"; import Giscus from "../../components/misc/Giscus.astro";import I18nKey from "@i18n/i18nKey";import { i18n } from "@i18n/translation";import MainGridLayout from "@layouts/MainGridLayout.astro";import { getSortedPosts } from "@utils/content-utils";import { getDir, getPostUrlBySlug } from "@utils/url-utils";import { Icon } from "astro-icon/components";import { licenseConfig } from "src/config";import ImageWrapper from "../../components/misc/ImageWrapper.astro";import PostMetadata from "../../components/PostMeta.astro";import { profileConfig, siteConfig } from "../../config";import { formatDateToYYYYMMDD } from "../../utils/date-utils";- 然后在许可证组件之后添加 Giscus 组件:
<!-- always show cover as long as it has one -->
{entry.data.image && <ImageWrapper id="post-cover" src={entry.data.image} basePath={path.join("content/posts/", getDir(entry.id))} class="mb-8 rounded-xl banner-container onload-animation"/> }
<Markdown class="mb-6 markdown-content onload-animation"> <Content /> </Markdown>
{licenseConfig.enable && <License title={entry.data.title} slug={entry.slug} pubDate={entry.data.published} class="mb-6 rounded-xl license-container onload-animation"></License>}
<Giscus repo="username/repo" repoId="" category="Announcements" categoryId="" /> <br></div></div>- 添加到友链页面
在 src/pages/friends.astro 文件中:
- 首先导入 Giscus 组件:import { getEntry, render } from "astro:content";import Giscus from "@components/misc/Giscus.astro";import Markdown from "@components/misc/Markdown.astro";import MainGridLayout from "@layouts/MainGridLayout.astro";import { Icon } from "astro-icon/components";import { siteConfig } from "../config";import { friends } from "../friends_data";- 然后在友链卡片组件之后添加 Giscus 组件:
<div class="grid grid-cols-1 md:grid-cols-2 gap-4"> {friends.map((friend) => ( <a href={friend.url} target="_blank" rel="noopener noreferrer" class="friend-card"> <div class="flex items-center gap-2"> <img src={friend.avatar} loading="lazy" class="w-5 h-5 rounded" alt={friend.name}> <div class="font-bold text-black dark:text-white">{friend.name}</div> </div> <div class="text-sm text-black/50 dark:text-white/50">{friend.description}</div> </a> ))} </div>
<Giscus repo="worhllo2/Blog-fuwari" repoId="R_kgDOR4xu1A" category="General" categoryId="DIC_kwDOR4xu1M4C58lt" />
</div></MainGridLayout>保存文件后重新构建项目即可看到评论区
通过以上步骤,你就成功为 Fuwari 添加了功能完善的评论系统,!🎉